Measuring water storage capacity
The experimental set-up is used to simulate a rainfall event on vegetated, open, and sealed ground. In this way, soil erosion and the effect of plants are illustrated. In addition, the different effects of rain on the soil with regards to the degree of sealing and soil vitality are highlighted.
LEARNING GOALS

Pupils can:
- name and justify positive effects of plants for the microclimate, air quality, soil and water cycle.
- deduce correlations – also with regards to climate change.
- carry out the experiment on water storage capacity according to instructions, document and evaluate the observations.
- Apply the knowledge gained to the design of the school environment.
Background Information
Subjects: Biology and Environmental Studies, Physics and Chemistry, Handicrafts Education
Required Materials: 3 empty 2-litre PET bottles, water, scissors, loose soil, piece of grass sod / turf tile, mount, three bowls (capacity at least 1 l), three measuring cups (capacity at least 0.5 l), labels, pencil
Required premises/equipment of the rooms: classroom
Ideal for: large group and small groups (for preparation and note-taking)
Time required: approx. 1 teaching unit (can be extended depending on preparation)
Preparation
- For the experiment, a suitable mount (holder) is needed for the three PET bottles, which should be made in advance. A handicraft lesson could be used to find ideas for this, design and build it together with the pupils in small groups.
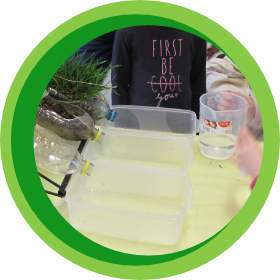
- In addition, the three PET bottles are cut open lengthwise near the neck of the bottle and a large area is cut out (cut in half lengthwise), see illustration. This can also be prepared in class with the pupils at the start of the experiment.
- Gather the soil and the grass tile as fresh as possible just before the experiment.
Tasks in class
- Introduce the topic of the positive effects of plants with the pupils. The following questions could be discussed: What benefits do plants have for us humans? How could we benefit from plants at school?
- Loose soil is filled into one of the prepared PET bottles and pressed down a little, the grass tile is pressed into another, the third bottle remains empty.
- The bottles are positioned with the help of the prepared mount so that they are slightly tilted and the opening points downwards (see illustration). A cup is placed under each bottle opening. Each measuring cup is filled with half a litre of water. The bottles or the bowls are labelled as follows:
- Empty bottle = sealed soil (e.g., asphalt).
- Bottle filled with loose soil = non-vegetated, unprotected soil (e.g., harvested field)
- Bottle filled with grass tile = vegetated, protected soil (e.g., meadow)
- Some pupils pour the contents of a measuring cup onto each of the experimental surfaces (if possible, at the same speed and from the same height). The others observe the process.
- Discuss with the pupils their observations.
- Where did the water run off fastest or slowest?
- In which bottle was more soil flushed out? Why is this so?
- What is the significance for humans in terms of natural hazards (mudslides, floods)?
- What can be done to protect the soil from erosion?
- What effect do plants have?
- Which water would be drinkable and why?