Creating and Managing a Wormery
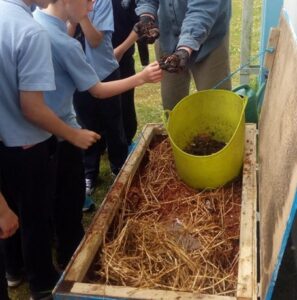
Creating and managing a wormery is an efficient method of turning kitchen waste and small amounts of garden waste into nutrient-rich compost and a concentrated liquid fertiliser. Worm composting is sometimes called vermicomposting.

BACKGROUND INFORMATION

- SUBJECTS: Science, Geography, Global Citizenship Education, Mathematics, Literacy
- IDEAL FOR: small groups of students
- REQUIRED PREMISES/EQUIPMENT:
– A well-ventilated space (e.g., school garden or school open space). A wormery can also be kept in a shed. It should be a secure area to prevent disturbance by other students or pests
– Table or shelving unit to keep the wormery off the floor if it’s small
– Access to water for washing hands and equipment
– Digital tools (tablet, laptop, or interactive whiteboard) for recording data and presenting findings
- TIME REQUIRED:
– Initial setup: approximately 1-2 lessons to set up the wormery
– Ongoing Maintenance: 15–30 minutes per week (seasonally
REQUIRED MATERIALS

- Wormery container with lid (e.g., plastic bin with ventilation and drainage holes). Ventilation and drainage are vitally important, or the worms will die
- Depending on the type of wormery, a tray or dish to catch drained liquid may be necessary or desirable. This liquid can be diluted with water for use as a plant feed
- Red or tiger worms. These may be obtained online or from a fishing tackle shop, or they may be gathered from a pile of compost or animal manure
- Organic waste (fruit and vegetable scraps, teabags, coffee grounds, eggshells). Keep citrus, onions and garlic, spicy and salty food to a minimum
- Bedding materials such as autumn leaves, compost, coir, shredded newspaper or small pieces of cardboard. This is used to fill up the wormery with moist bulking material which provides a habitat for the worms to live in. Ensure that the bedding is well moistened before adding the worms
- Gloves
- Small trowel
- Logbook for recording observations
- Weighing scales (for measuring organic waste)
- Posters or charts to explain the wormery process
Preparation
First, consider the conditions required for a wormery. Worms are most active in warm moist conditions, ideally between 18-25ºC. Their activity noticeably declines below 10ºC and above 30ºC. A wormery should be kept in a shed or a sheltered area of the garden where it gets neither too cold in the winter nor too hot in the summer.
If considering keeping wormeries indoors or on a balcony, consider that when neglected they can sometimes produce odours. Composting worms prefer a pH of 6.5-7.0, and well-ventilated conditions to live in. They will not tolerate extreme acidity and dislike being waterlogged because this restricts their supply of air.
In Class Tasks
- If it’s a stacking wormery, start with one tray. In the bottom, place an 8cm layer of moist bedding material. This creates a humid layer in which the worms can burrow and begin to digest their food.
- If the wormery is a single container, fill it at least half full (ideally nearly to the top) with bedding.
- Add the composting worms.
- Cover with no more than 8-10cm (3¼-4in) layer of kitchen waste, or bury a few handfuls of food into the bedding.
- Leave for about one week to allow the worms time to settle into their new environment.
Feeding the worms (adding waste)
- Chop the waste into smaller pieces so it can be eaten faster. For best results, add small amounts of waste often to the wormery.
- Place the food on the top of the bedding.
- Alternatively, bury the food within the bedding to create feeding pockets. This practice will help to reduce odours and fruit flies.
- If the waste is not being eaten, feeding should be stopped until the worms start to work through the existing food.
TIP

Avoid adding more waste than the worms can cope with.
Refer to Composting Ireland for more information on managing wormeries.
TIP
What not to put in a wormery:
- Dairy products, fat, grease, meat, fish and bones as these are likely to attract unwanted pests and flies
- Salt, spicy foods, or large quantities of citrus or onion family plants
- Larger quantities of tough leaves and woodier material as it will slow the system down
- Grass cuttings, which will heat up and may injure the worms
Emptying the Wormery
When the bedding has all been eaten by the worms, it is time to empty the vermicompost which is also known as worm castings.
The worms tend to congregate in the area just below the top layer of food waste. Simply remove the top 20 cm (8in) layer and set it aside. Dig out the compost that is ready for use, and restart the wormery with fresh moist bedding and replace the layer that was removed.
Many wormeries use a series of stacking trays. Each tray has holes in the bottom, and when one tray is full then the next tray is placed on top and used to place bedding and food into. The worms move up through the holes into the fresh material, and when all trays have been filled the bottom tray should be checked. It is likely that all bedding and food in this tray will be composted, and the worms will all have migrated up into the newer trays. The bottom tray is emptied and can be placed on top of the stack as the next tray for feeding. This makes sorting the worms unnecessary
Worm compost and liquid – how to use
The worm compost can be used as a general soil conditioner or as a constituent of homemade growing media. It is generally rich in nitrogen and potassium. The liquid drained from wormeries can be used as a liquid fertiliser on garden plants after diluting with water at a rate of 1 part liquid to 10 parts water. As well as having nutrient value, worm compost and liquid are rich in beneficial microbes that help plants to grow and to resist disease.
HINT
Worms have a mouth but have no eyes to see. However, they can sense light. They move away from light, preferring the dark. Worms also have several hearts – the number varies between species, but many types have five hearts.
Remember: Fruit and vegetable scraps that contain seeds can be included but the seeds may germinate in the wormery.